Table of Contents
- Webpay Module Start
- Cancelling a Check Request
- Check Group Approval
- How To Print Checks
- Printing the Check
- Print Confirmation
- Check Administration
- STOP/VOID an ISSD Check
- Printer Setup
- Editing Existing & Creating New Alignments
Webpay Module
Click on the ‘Webpay’ button on the Check Search screen to enter the Webpay module (a new window will open)
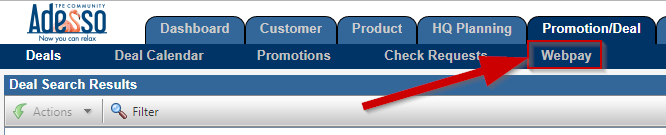
Managing Requests
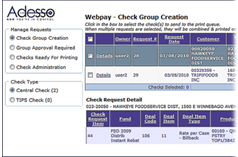
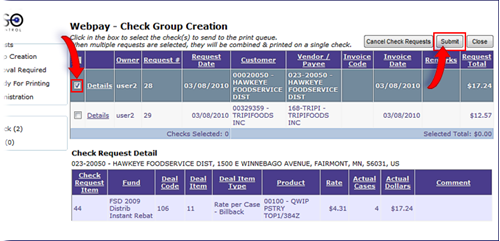
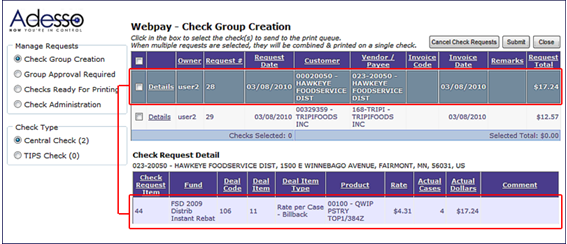
Check Group Creation
The ‘Check Group Creation’ screen allows the user to select the Check Requests that have been approved in TradeAdvantage to be printed. If there are multiple requests for a Payee (Vendor), the requests can be combined into one check group.
To select a Check Request to send to the print queue, click in the box to the left of the Check Request and then click on the ‘Submit’ button.
Grouping Check Requests
To group multiple requests together, select the Check Requests and click on the Submit button at the top of the screen.
The system allows up to five Check Requests to be grouped together. Security can be set to limit a user to a lesser number of grouped requests. If a user attempts to group more Check Requests than is allowed by the system or their security limit, the Check Group will be placed in GAPV (Group Approval Required). (cont’d)
Security can also limit the total grouped dollar amount of a Check Group. If the dollar amount of the grouped requests exceeds the user’s limit, the Check Group will be placed in GAPV (Group Approval Required) and the Check Group will require a user with the privilege ‘Approve Print Groups’ to authorize the Check Group.
Cancelling a Check Request
To cancel a Check Request, select the Check Request and click on the ‘Cancel Check Requests’ button at the top of the screen. The Check Request will be placed in ‘Canceled’ status and all Deal Activity records associated with the Request will be reversed.
To view the Details of a Check Request, click on the ‘Details’ link. The ‘Check Request Detail’ portion of the screen will display the Check Request line items that comprise the request.
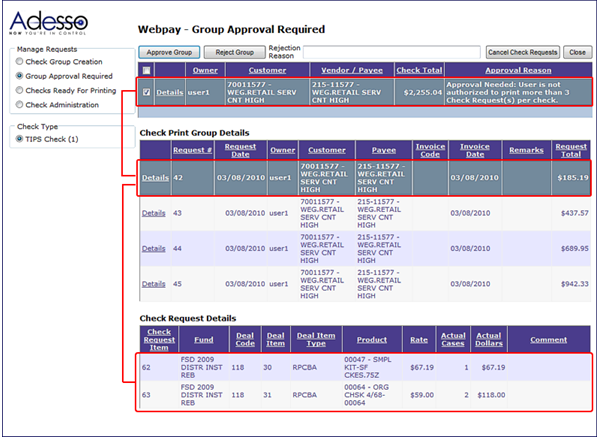
Check Group Approval
Checks Groups requiring approval are managed in the ‘Check Approval Required’ screen.
To view the Details of the Check Group, click on the ‘Details’ link. The ‘Check Print Group Details’ portion of the screen will display the Check Requests contained in the Group. To view the line items of a Check Request, click on the ‘Details’ link in the ‘Check Print Group Details’. The ‘Check Request Detail’ portion of the screen will display the Check Request line items that comprise the request.
Approve a Check Group
- Select the Check Group in the upper portion of the screen.
- Click the ‘Approve Check’ button. The approved Check Group will be available for printing.
Reject a Check Group
- Select the Check Group
- Enter the reason for the rejection in the field provided.
- Click the ‘Reject Check’ button.
The Check Requests that comprise the Group will revert to their previous approved status (APPR or PROC). The reason the Check Group was rejected will appear in the ‘Group Comment’ column of the Check Search screen on the Check Requests pane.
Cancel a Check Group
- Select the Check Group.
- Click on the ‘Cancel Check Requests’ button at the top of the screen.
The Check Request(s) that comprise the group will be placed in ‘Canceled’ status and all Deal Activity records associated with the Check Request(s) will be reversed.
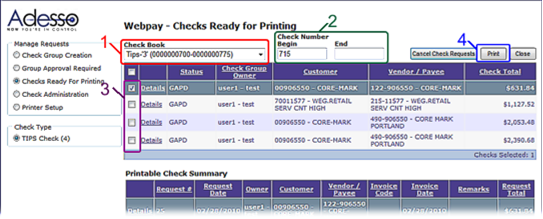
How-To Print Checks
To print available checks from the ‘Adesso Check Printing’ screen, the user needs to have been granted the permission to print the check type and have available check stock assigned to their login.
- Select the checkbook from the ‘Check Book’ drop down.
- If necessary, edit the ‘Next Check Number’
- Select the Check(s) to be printed by clicking into the selection box (to the left of the Check Request)
Multiple Checks can be selected and sent to the printer.
When sending multiple checks to the printer, the ‘Check Number’ Begin and End fields must be completed. The ‘Begin’ and ‘End’ check number series must equal the number of checks being sent to the printer and may not come from different Check Books. - Click on the ‘Print’ button.
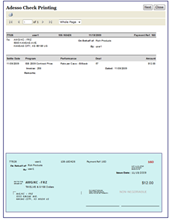
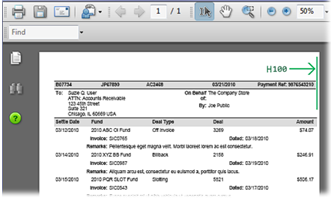
The next screen will display a print preview of how the Check Request will appear on the Check stock. The remittance portion of the Check will display a summary of the Check including the individual Check Requests that have been combined into one check.
The bottom portion of the print preview will display the information to be printed on the Check stock (only the data will be printed – the blue shading that represents the check on the print preview will not print on the Check)

Printing the Check
To close the Print Preview window without printing the check, click on the ‘Close’ button on the Print Preview screen. The print queue will not be cleared, nor will the Check number be advanced.
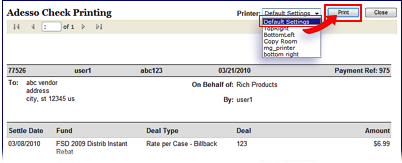
To print the check(s) choose a specific printer alignment from the dropdown (see ‘Printer Setup’ later in this document to define printer alignments) and click on the ‘Print’ button.
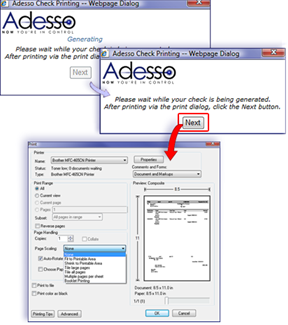
- To send the Check Request to the printer, click on
the ‘Print’ button in the upper right corner of the
print preview screen. - The Check will be rendered. Click on the ‘Next’ button.
- The standard Windows print dialog box for your
printer will appear. - Click ‘OK’ to send the check to the printer.
If the printed Check is not aligned on the check stock,
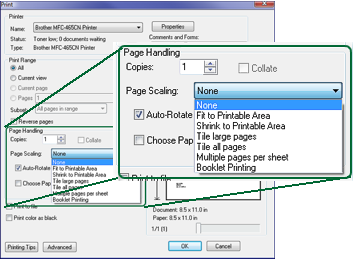
- Adjust the Page Scaling in the Print Dialog box.
Choosing ‘None’ may allow the Check to print
within the area provided. - Fine-tune the print alignment
(see ‘Printer Setup’ later in this document)
Print Confirmation
When the Check has been printed, the ‘Print Confirmation’ dialog box will appear. Indicate whether the Check printed successfully by choosing the ‘Yes’ radio button and clicking on the ‘Submit’ button.
If the Check did not print successfully,
- Click on the ‘No’ radio button
- Choose the ‘Reason’ from the drop down.
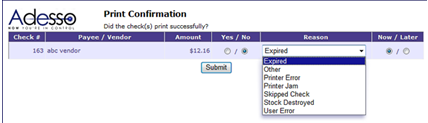
- Indicate whether the Check will be printed Now or Later
-
- If ‘Later’ is chosen, the Check Group will be available to be selected once again from the ‘Checks Ready for Printing’ screen.
- If ‘Now’ is chosen, the Check number will advance and the preview of the Check will appear, allowing the user to follow the ‘Printing the Check’ instructions (above).
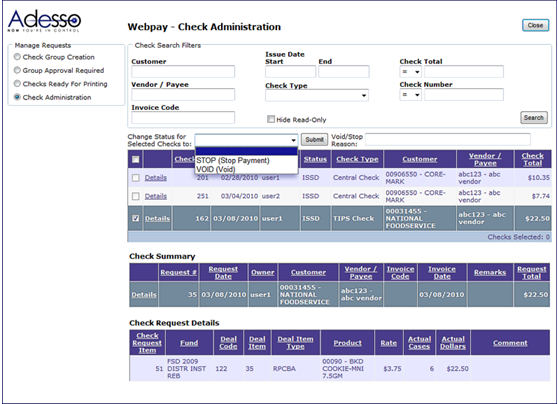
Check Administration
The Check Administration screen allows a user to manage checks that are in ISSD (Issued) status. A check that is in ISSD status can be moved to STOP or VOID. Once the status change has been submitted, the associated Check Requests will be placed in ‘Canc’ (Cancelled) status and all DealActivity will be reversed. To re-issue the check, a new Check Request will need to be entered and processed through Webpay – the existing (Cancelled) Check Request cannot be re-used.
The permissions required to manage the printed checks are:
Manage Own TIPs/Central Check: The owner of the Check Request (the user who created the Request) with this permission can move the ISSD TIPs/Central Check to VOID or STOP Status
Manage Others TIPs/Central Checks: Users with this permission can move ISSD TIPs/Central Checks to VOID or STOP status for the Customers, Products, Deals, etc. they have access to.
STOP / VOID an ISSD Check
To change the status of a printed check that is in ISSD (Issued) status –
- In the Webpay module, select the ‘Check Administration’ radio-button on the left side of the Webpay screen.
- In the Check Administration screen, select the check(s) you wish to change the status of by placing a check in the box to the left of the Check Group.
- To view the Check Request(s) associated to this Check Group, click on the underlined ‘Details’ link – the Check Request information will appear in the ‘Check Summary’ grid.
- To view the Check Request line items associated with the Check Request, click on the underlined ‘Details’ link in the Check Summary grid -- the Check Request item information will appear in the ‘Check Request Details’ grid.
- Choose the new status (VOID or STOP) from the status drop-down, enter the Void/Stop Reason in the field provided, and click on the ‘Submit’ button.
- To exit the Check Administration screen,
- Make a new selection in ‘Manage Requests’
- Click the ‘Close’ button in the upper right corner of the Check Administration screen to exit Webpay completely.
Printer setup
Depending on your printer, the actual check portion of the printed check may not line up correctly (e.g., printing is too high or too far to the left or right) when printed on the check stock.
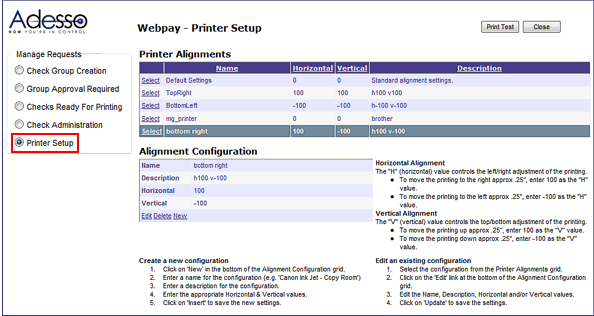
The ‘Printer Setup’ screen will help you to fine-tune the printing of checks with your printer.
The settings you configure and save will be accessible only by your login. If there are other users sharing the same printer, they will need to enter configuration settings while logged into the Webpay module, so the settings are saved and available for that login.
Printing a ‘Test’ page
Begin by choosing the ‘Default Setting’. Click the ‘Print Test’ button and compare printed results with a sheet of check stock for alignment. If the printed check is aligned correctly, there is no configuration necessary and you can print to the selected printer using the ‘Default’ settings.
If the printed page is too high, too low, too far to the right or left, you will need to fine-tune the alignment of the printed page.
Horizontal alignment
The ‘H’ (horizontal) value controls the left – right adjustment
of the printing.
Valid entries are all numbers between -100 and 100
(e.g., -100, -66, -5, 0, 15, 100)
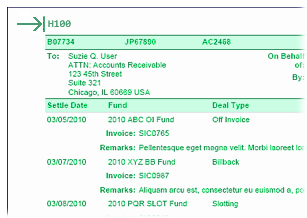
- To move the printing to the right approximately ¼”, enter 100 as the ‘H’ value (‘Green’ image)
- To move the printing to the left approximately ¼”, enter -100 as the ‘H’ value
Vertical alignment
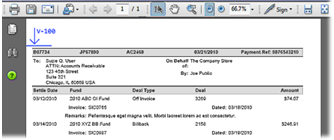
The ‘V’ (vertical) value controls the top – bottom adjustment of the printing. Valid entriesare all numbers between -100 and 100 (e.g., -100, -66, -5, 0, 15, 100) 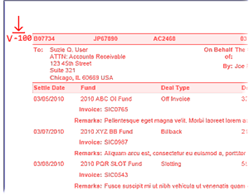
- To move the printing up approximately ¼”, enter 100 as the ‘V’ value
- To move the printing down approximately ¼”, enter -100 as the ‘V’ value. (‘Red’ image)
Editing Existing & Creating New Alignments
Edit an existing alignment
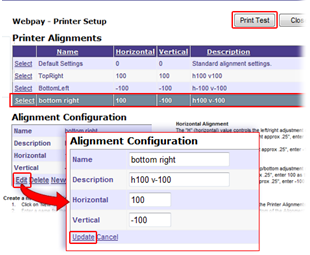
To edit an existing configuration, click on the ‘Select’ link to the left of the configuration and click on the ‘Edit’ link in the lower-left of the ‘Alignment Configuration’ grid.
- Edit the Name, Description, Horizontal, and/or Vertical
values and click on the ‘Update’ link to save the changes. - Click on ‘Cancel’ to exit ‘Edit’ mode without saving your
changes. - Click the ‘Print Test’ button and compare printed results
with a sheet of check stock for alignment.
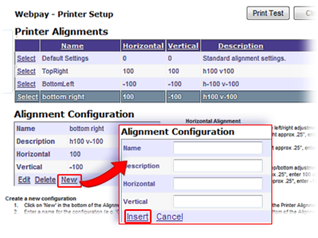
- Click on the ‘New’ link in the lower-left of the ‘Alignment Configuration’ grid.
- Enter the Name, Description, Horizontal, and/or Vertical values and click on the ‘Insert’ link to save the changes.
- Click on ‘Cancel’ to exit ‘Edit’ mode without saving your changes.
- Click the ‘Print Test’ button and compare printed results with a sheet of check stock for alignment.
Printing Using a defined ‘Printer Alignment’
After defining a Printer Alignment, while in the ‘Adesso Check Printing’ preview screen, choose the ‘Printer Alignment’ to print the check from the ‘Printer’ drop-down box before clicking on the ‘Print’ button.
& follow the ‘Print Checks’ topic of this document to continue with the printing process.